Discover how a Next.js server interfaces with Circle’s Programmable Wallets API to initialize wallets.
Discover how a Next.js server interfaces with Circle’s Programmable Wallets API to initialize wallets, then prompts the iOS SDK for PIN & security question setup
Next.js, the popular React framework, can seamlessly integrate with external services and APIs. In this tutorial, we will walk through a server-side function in Next.js that simplifies the process of initializing Circle’s Programmable Wallets. Initialization is crucial to a wallet because it ensures that each individual is given a distinct identity within the system, allowing for personalized interactions and wallet security. This is particularly helpful for developers who want a streamlined workflow without the hassle of handling multiple API calls. To demonstrate this integration, our demo application will showcase how Next.js server-side scripts can be paired with an iOS app, enabling users to effortlessly setup a pin code for their first wallet.
Building Wallet Initialization Server
Our server-side function consolidates three POST requests into one, making it easy for developers to initialize and create a user wallet. Additionally, it aids in setting up the PIN code and security questions for the wallet using the iOS SDK on a mobile device.
Let’s dive into the code to understand how it functions, and how to set it up (full code available in our Github Repo):
1. Generating a User ID:
//app/api/user/route.js
const user_id = v4();
Here, we are utilizing the
`uuid`library to generate a unique user ID for the new user. This ID will be used in subsequent API requests.
2. Creating a User:
//app/api/user/route.js
const res1 = await fetch(process.env.CIRCLE_BASE_URL + 'users', {
  method: 'POST',
  headers: {
    'Authorization': `Bearer ${process.env.CIRCLE_API_KEY}`,
    'Content-Type:' 'application/json',
  },
  body: JSON.stringify({
    'userId': user_id,
  })
});
const data1 = await res1.json();
The first POST request to Circle’s API is for creating a user. We pass the generated `user_id` in the body and use the `CIRCLE_API_KEY` for authorization. Upon successful execution, the response will return an empty JSON object, which means `data1` will not store any value. If you don’t already have a CIRCLE_API_KEY, please sign up for a developer account here.
3. Fetching User Token and Secret Key:
//app/api/user/route.js
const res2 = await fetch(process.env.CIRCLE_BASE_URL + 'users/token', {
   method: 'POST',
   headers: {
      'Authorization': `Bearer ${process.env.CIRCLE_API_KEY}`,
      'Content-Type:' 'application/json',
   },
   body: JSON.stringify({
      'userId': user_id,
   })
});
const data2 = await res2.json();
After successfully creating a user, we make a second POST request to retrieve the user-specific credentials. The return response, which is stored in `data2`, provides us with both the `userToken` and the `encryptionKey` values. This userToken is pivotal for subsequent interactions with Circle’s Programmable Wallets API.
4. Initializing the User Wallet:
//app/api/user/route.js
const res3 = await fetch(process.env.CIRCLE_BASE_URL + 'user/initialize', {
   method: 'POST',
   headers: {
      'Authorization': `Bearer ${process.env.CIRCLE_API_KEY}`,
      'Content-Type': 'application/json',
      'X-User-Token': data2['data']['userToken'],
   },
   body: JSON.stringify({
      'idempotencyKey': v4(),
      'blockchains': ["MATIC-MUMBAI", "ETH-GOERLI", "AVAX-FUJI"],
   }),
});
const data3 = await res3.json();
The third POST request is where the magic happens. We initialize the user’s wallet by specifying the blockchains that the wallet should support. An `idempotencyKey` is also provided to ensure that the request is only processed once, even if it’s sent multiple times. Upon a successful response, a JSON object containing the challenge ID is returned and stored in the variable `data3`, which then triggers the mobile SDK to initiate the setup process for a PIN code and security questions for the wallet.
5. Error Handling:
For each API call, there’s a subsequent check:
//app/api/user/route.js
if(data3['code']) {
            return NextResponse.json(data3)
        }

        return NextResponse.json({
            'userId': user_id,
            'userToken': data2['data']['userToken'],
            'encryptionKey': data2['data']['encryptionKey'],
            'challengeId': data3['data']['challengeId'],
        });
    } catch (e) {
        console.log(e);
        return NextResponse.json(e, { status: 500 });
    }
6. Final Response:
Upon successful execution of all the above steps, the function will return a consolidated response to the client, which includes the `userId`, `userToken`, `encryptionKey`, and `challengeId`. This data will subsequently be used by the iOS SDK on the mobile end to set up the PIN and security questions.
Integrating Circle’s Server Response in an iOS App for Wallet Initialization
While the Next.js server-side scripts effectively manage API integrations, their power truly shines when the iOS app efficiently captures and leverages this streamlined response.
1. Initializing the API Request:
//w3s-ios-sample-app-wallets/w3s-ios-sample-app-wallets/CircleWalletViewModel.swift

var request = URLRequest(url: URL(string: circleBaseURI + "/api/user")!,timeoutInterval: Double.infinity)
request.addValue("application/json", forHTTPHeaderField: "Content-Type")
request.httpMethod = "POST"
Here, a `URLRequest` object is set up to make a POST request to our Next.js server endpoint that initiates the user and wallet creation process.
2. Processing the Server Response:
//w3s-ios-sample-app-wallets/w3s-ios-sample-app-wallets/CircleWalletViewModel.swift

let task = URLSession.shared.dataTak(with: request) {...}
task.resume()
Using the `URLSession`, the iOS app sends the POST request. Once the response is received, it’s processed within the closure. The `JSONDecoder` is utilized to parse the server’s response into a `UserData` object.
3. Storing and Utilizing the Data:
//w3s-ios-sample-app-wallets/w3s-ios-sample-app-wallets/CircleWalletViewModel.swift

self.userToken = userData.userToken
UserDefaults.standard.set(self.userToken, forKey: "circleUserToken")
...
self.state = .userTokenSecretKeychallengeIdCreated
Once decoded, vital information like `userToken`, `encryptionKey`, and `challengeId` is saved both in the app’s runtime and persistent storage (using UserDefaults) for later use.
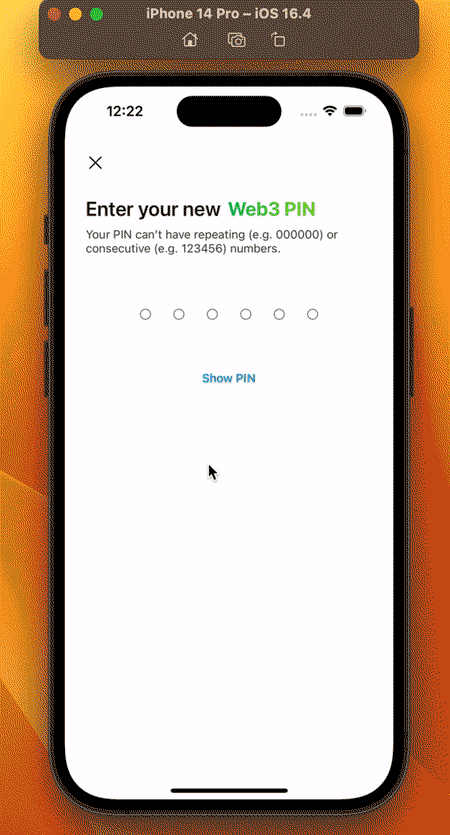
Initiating the SDK Pin Code Setup
1. Executing the Challenge:
//w3s-ios-sample-app-wallets/w3s-ios-sample-app-wallets/CircleWalletViewModel.swift

func executeChallenge() {...}
After the server’s response has been processed and the necessary data stored, the app can proceed to initiate the mobile SDK’s pin code setup. The `executeChallenge` function is designed for this purpose.
2. Calling the SDK Function:
//w3s-ios-sample-app-wallets/w3s-ios-sample-app-wallets/CircleWalletViewModel.swift

WalletSdk.shared.execute(userToken: self.userToken, encryptionKey: self.secretKey, challengeIds: [self.challengeId]) {...}
Here, the WalletSdk’s `execute` method is called with the `userToken`, `encryptionKey`, and `challengeId` as arguments. This method communicates with Circle’s backend to execute the pin code setup challenge.
3. Handling SDK Response:
Based on the SDK’s response, the app updates its state. If the challenge is successful, the state is updated to `.challengeSuccessful`. In case of an error, the `errorHandler` function is called, providing detailed error feedback and the app’s state is set to `.challengeFailed`.
Conclusion
The collaboration between server-side logic in Next.js and client-side implementation in an iOS app provides a seamless user experience for setting up pin codes in Circle’s Programmable Wallets. For further insights and discussions, I invite you to join the Circle Discord community. If you’d like to connect with me directly, feel free to find me on Twitter @corey__cooper.

*Programmable Wallets application programming interface (“API”) is offered by Circle Technology Services, LLC (“CTS”). CTS is not a regulated financial services company and the API does not include financial, investment, tax, legal, regulatory, accounting, business, or other advice. For additional details, please see Circle's Developer terms of service.