Tutorial to integrate RainbowKit and Circle’s Bridge Kit to add crosschain USDC transfers and wallet connectivity. Use this walkthrough to start building.

Given that browser-based wallets are among the most common types of crypto wallet, having a “Connect Wallet” button on an application is becoming an expectation among users. As the ecosystem expands, there are more competing wallets on the market, and it is not uncommon for someone to have multiple wallets installed and active at the same time.
Even though we have the EIP-1193: Ethereum Provider JavaScript API that standardizes a Provider object and specifies its expected behaviors, the fragmented wallet ecosystem has made it quite challenging for application developers to connect to their users’ wallets. Thankfully, we have libraries like wagmi that help to abstract the wallet, provider and network logic into a more convenient developer experience.
In this tutorial, we will be integrating RainbowKit, which is a React library built on top of wagmi and viem that allows us to add a wallet connection component to our bridging application, powered by Bridge Kit.
Crosschain transfers with Bridge Kit
Bridge Kit is powered by CCTP under the hood, and abstracts away a lot of the complexity of implementing CCTP, especially with the large number of bridge routes across numerous chains. An example of the key method call is as follows:
// Transfer 10.00 USDC from Arc Testnet to Solana Devnet
const result = await kit.bridge({
  from: { adapter: viemAdapter, chain: "Arc_Testnet" },
  to: { adapter: solanaAdapter, chain: "Solana_Devnet" },
  amount: "10.00",
});
Bridge Kit makes use of adapters to manage the blockchain-specific bridging operations for a particular network and is fully compatible with viem or ethers for EVM-compatible blockchains and Solana.
To retrieve a full list of supported chains, we can use the getSupportedChains() method, which returns an array of blockchain objects, each containing key information about the chain that can be used in our application’s UI.
{
  "type": "evm",
  "chain": "Arc_Testnet",
  "name": "Arc Testnet",
  "title": "ArcTestnet",
  "nativeCurrency": {
    "name": "Arc",
    "symbol": "Arc",
    "decimals": 18
  },
  "chainId": 5042002,
  "isTestnet": true,
  "explorerUrl": "https://testnet.arcscan.app/tx/{hash}",
  "rpcEndpoints": [
    "https://rpc.testnet.arc.network/"
  ],
  "eurcAddress": "0x89B50855Aa3bE2F677cD6303Cec089B5F319D72a",
  "usdcAddress": "0x3600000000000000000000000000000000000000",
  "cctp": {
    "domain": 26,
    "contracts": {
      "v2": {
        "type": "split",
        "tokenMessenger": "0x8FE6B999Dc680CcFDD5Bf7EB0974218be2542DAA",
        "messageTransmitter": "0xE737e5cEBEEBa77EFE34D4aa090756590b1CE275",
        "confirmations": 1,
        "fastConfirmations": 1
      }
    }
  },
  "kitContracts": {
    "bridge": "0xC5567a5E3370d4DBfB0540025078e283e36A363d"
  }
}
In our React application, we make use of a custom hook just for the bridging functionality by initializing the SDK, then calling the bridge method on it, passing in the necessary parameters supplied from the user interface.
import { BridgeKit } from "@circle-fin/bridge-kit";

const kit = new BridgeKit();
const result = await kit.bridge({
  from: { adapter: params.fromAdapter, chain: params.fromChain as any },
  to: { adapter: params.toAdapter, chain: params.toChain as any },
  amount: params.amount,
});
Adding the Connect Wallet button
Make sure to follow the instructions from RainbowKit’s documentation to install and set up RainbowKit into the project. It has dependencies on wagmi, viem and TanStack Query. The application has to be wrapped in the necessary providers for the ConnectButton component to work.
import { ConnectButton } from '@rainbow-me/rainbowkit';

export const App = () => {
  return <ConnectButton />;
};
The component comes with a button that triggers a modal which detects available wallets to connect to and connects the application to the wallet chosen by the user.
Building the adapter object with wagmi
Once the user’s wallet is connected to our application, wagmi allows us to pull the wallet connection information and extract the EIP-1193 provider so we can build an adapter object that Bridge Kit recognizes and will use for the transfer.
import { useConnectorClient } from "wagmi";
import { createAdapterFromProvider } from "@circle-fin/adapter-viem-v2";

// Get the connected wallet's provider from wagmi
const { data: client } = useConnectorClient();
const provider = client?.transport?.value?.provider;

// Use that provider to create the adapter
const adapter = await createAdapterFromProvider({ provider });
return adapter;
Depending on how the application is structured, this logic can be put in a separate custom hook or implemented as part of a component. If this adapter logic is implemented as a custom hook, we can use it in the relevant component when the bridge hook is called.
Putting it all together
We would use state to capture the user’s inputs for their chosen source chain, destination chain and amount to transfer, and call the bridge hook with the adapter and user inputs.
const { evmAdapter } = useEvmAdapter();
const [sourceChain, setSourceChain] = useState<SupportedChain>("Arc_Testnet");
const [destinationChain, setDestinationChain] = useState<SupportedChain>("");
const [amount, setAmount] = useState<string>("0");

const { bridge, isLoading, error, clear } = useBridge();

const response = await bridge({
  fromChain: sourceChain,
  toChain: destinationChain,
  amount,
  fromAdapter: evmAdapter,
  toAdapter: evmAdapter,
});
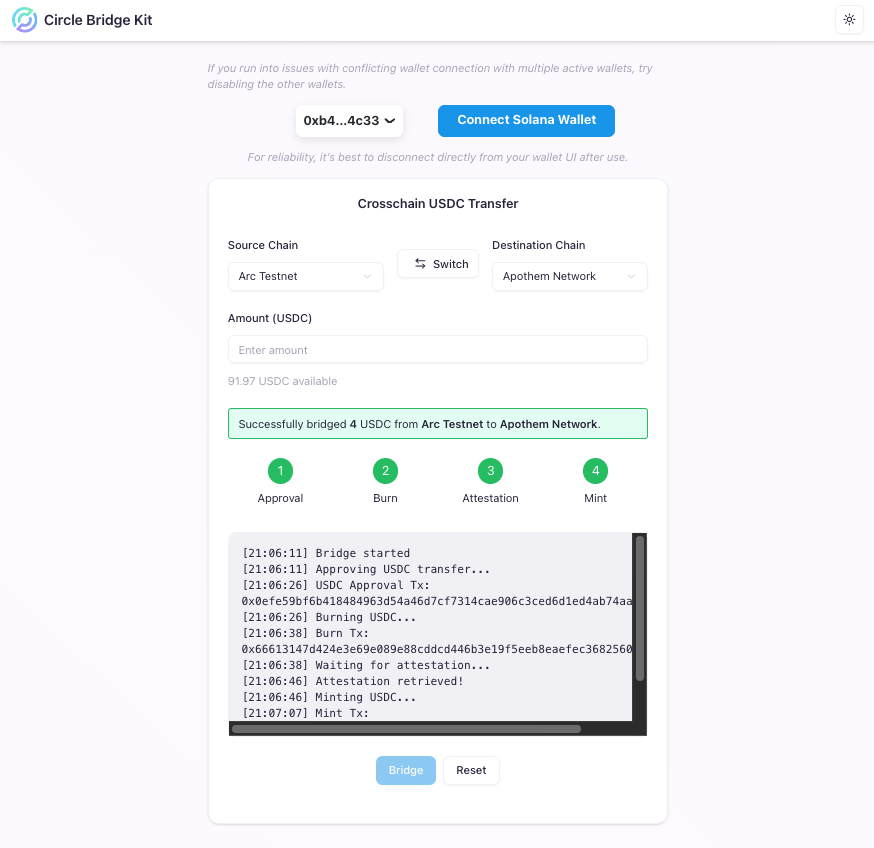
The response object contains a lot of information about the entire CCTP transaction, including chain details, contract addresses and details of each step, which can be used to build out informative UIs for the end-user. The following is an abridged version of the response:
{
  "state": "success",
  "amount": "4000000",
  "token": "USDC",
  "source": {
    "address": "0xf6aa88ee4b7b10abbffbfa7d85bcffef7eab6fe4",
    "chain": {...}
  },
  "destination": {
    "address": "0xf6aa88ee4b7b10abbffbfa7d85bcffef7eab6fe4",
    "chain": {...}
  },
  "steps": [
    {
      "name": "approve",
      "state": "success",
      "txHash": "0x0efe59bf6b418484963d54a46d7cf7314cae906c3ced6d1ed4ab74aacddb062b",
      "data": {
        "txHash": "0x0efe59bf6b418484963d54a46d7cf7314cae906c3ced6d1ed4ab74aacddb062b",
        "status": "success",
        "cumulativeGasUsed": "222484",
        "gasUsed": "55684",
        "blockNumber": "8359932",
        "blockHash": "0xfb96409a5cf4f370196911c5b79daaf304b4744b7ab44362b0e92f75ad456727",
        "transactionIndex": 6,
        "effectiveGasPrice": "660000000000"
      },
      "explorerUrl": "https://testnet.arcscan.app/tx/0x0efe59bf6b418484963d54a46d7cf7314cae906c3ced6d1ed4ab74aacddb062b"
    },
    {
      "name": "burn",
      ...
    },
    {
      "name": "fetchAttestation",
      ...
    },
    {
      "name": "mint",
     ...
    }
  ],
  "config": {
    "transferSpeed": "FAST"
  },
  "provider": "CCTPV2BridgingProvider"
}
Wrapping up
We have built a sample application that incorporates the key points covered in this tutorial to bridge USDC across all the chains that support CCTP. Feel free to clone the GitHub repo and play around with the application to see how it works.
Combining RainbowKit for wallet connection and Bridge Kit for crosschain USDC transfers allows us to build a smoother user experience with fewer lines of code. Check out Bridge Kit to start integrating crosschain transfers into your own application.